Save the Packaging, Build a Box
Their parcels, your papers

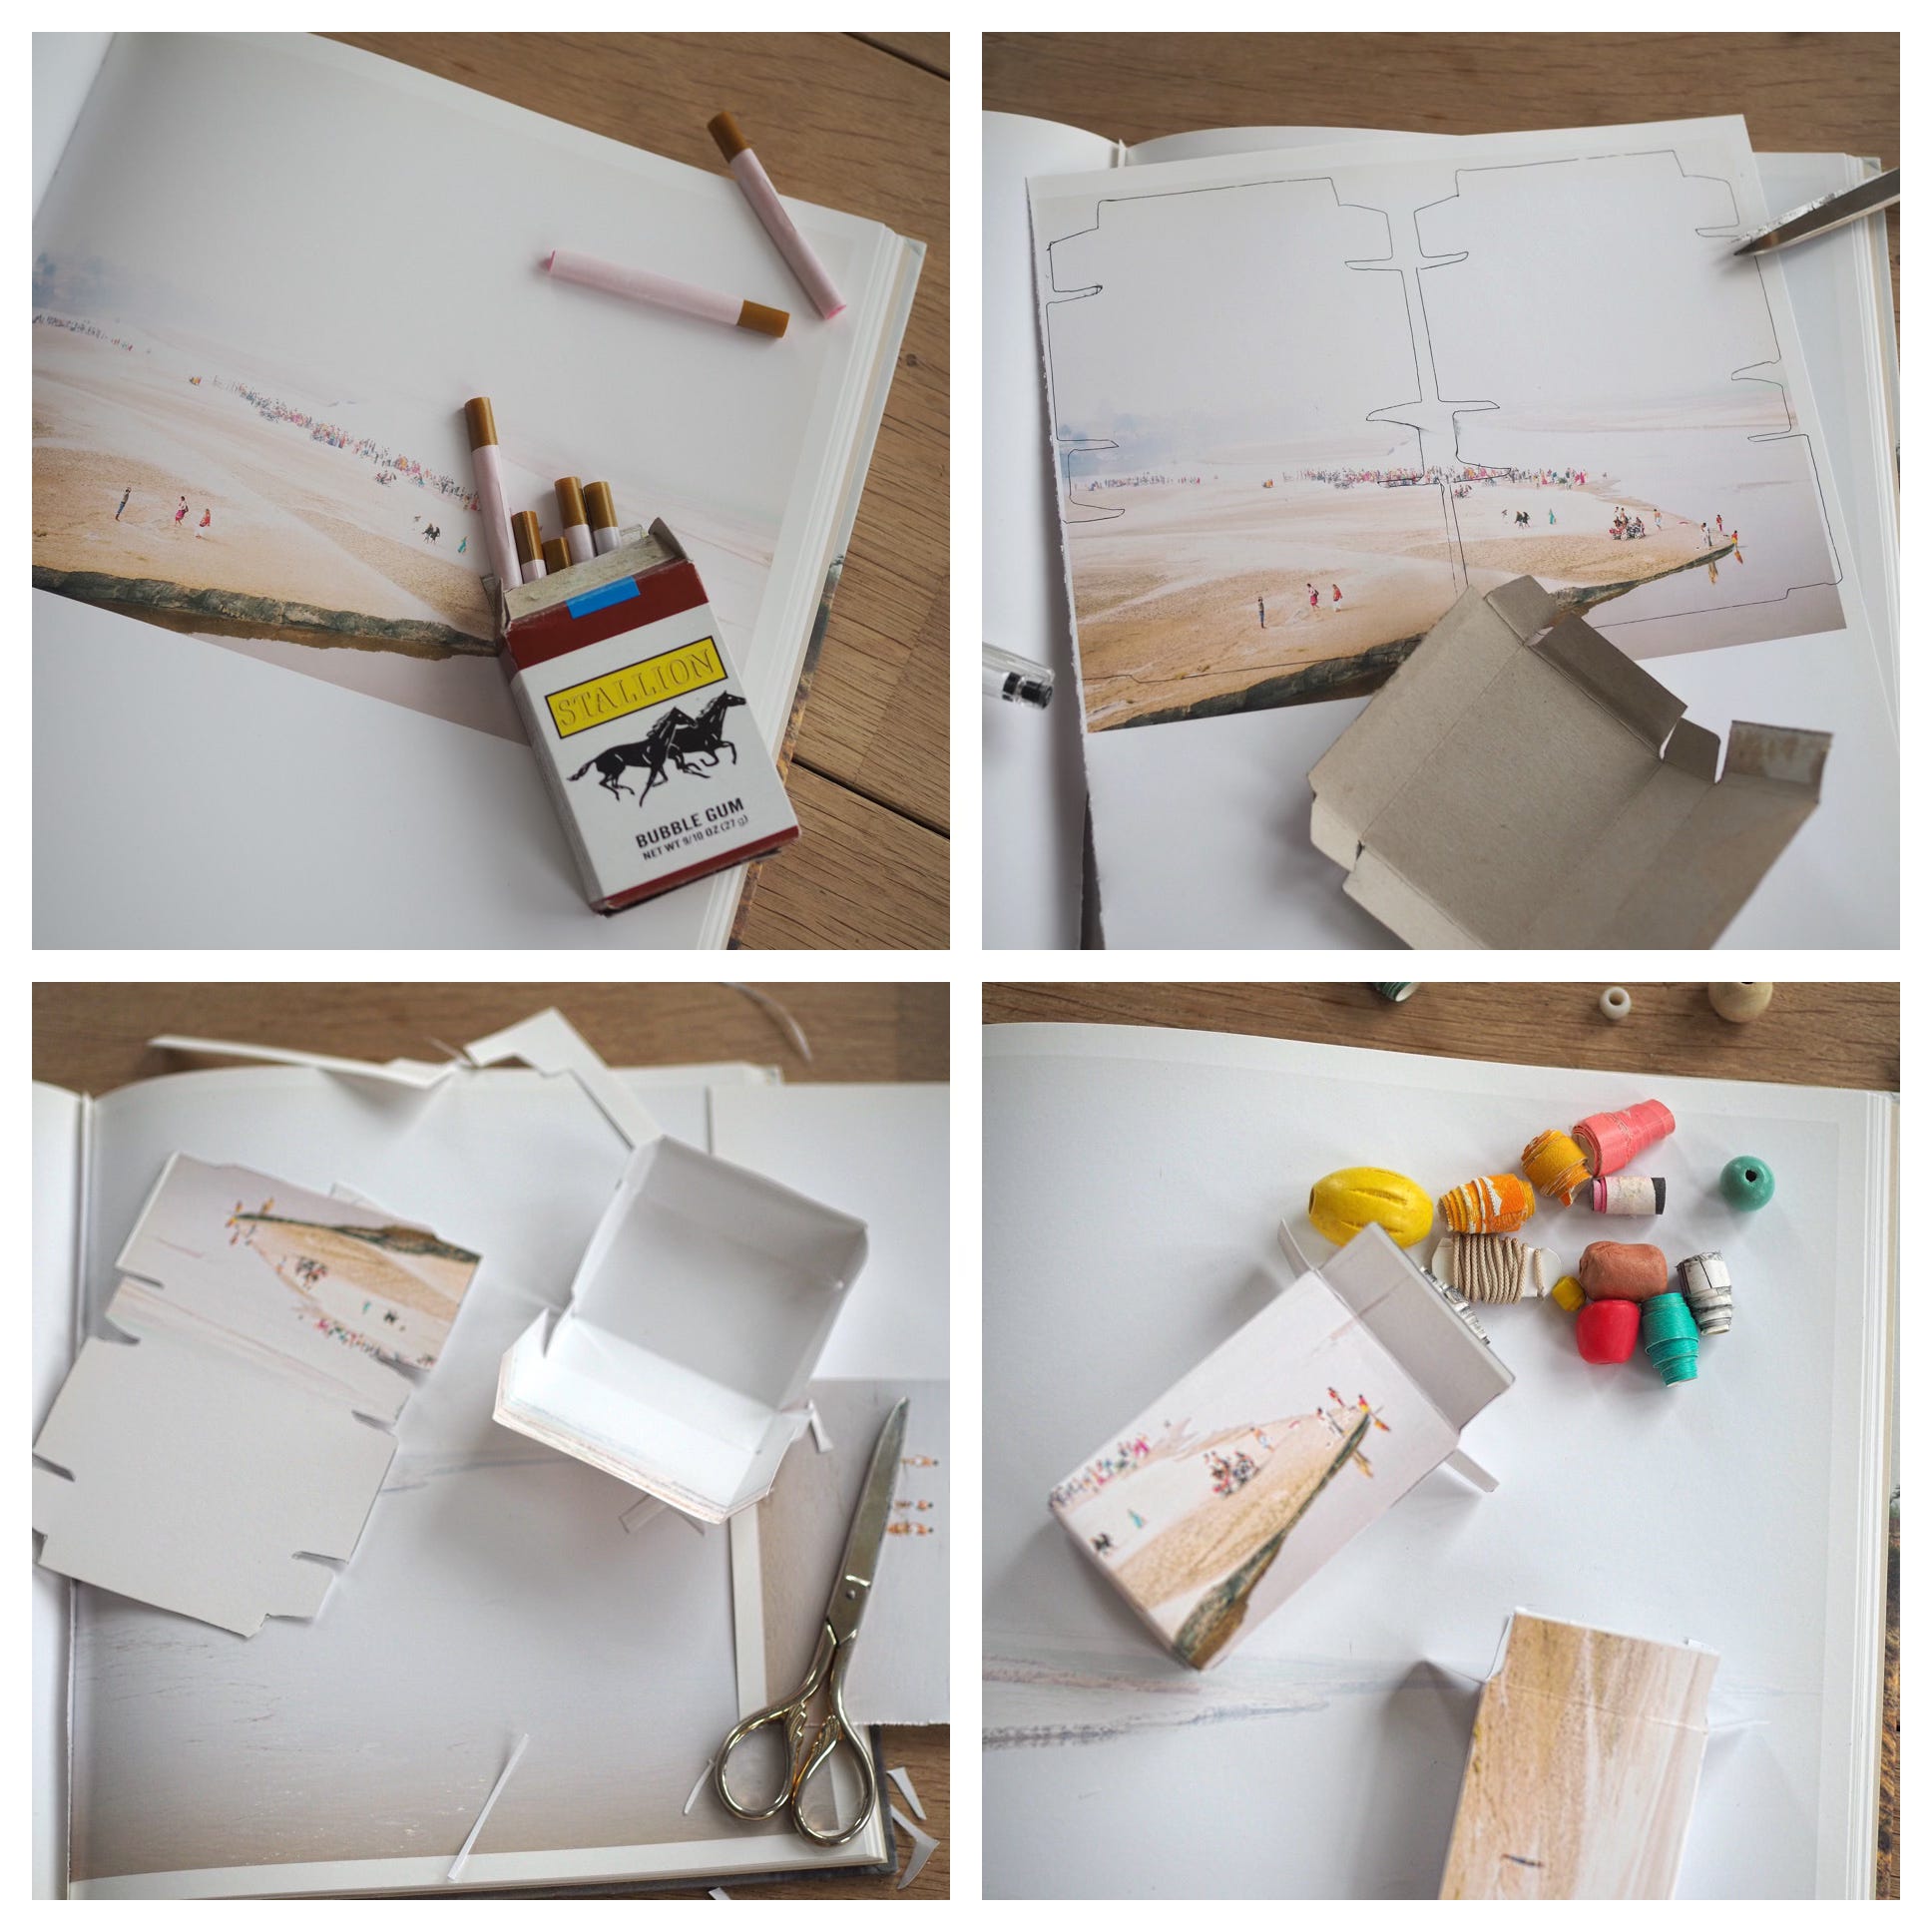
Last month, while strolling on the Lower East Side, I purchased a box of bubble-gum cigarettes at Economy Candy. I wanted the candy, not for the kids confection posing as carcinogenic sticks, or the saccharine, chalk-like chewing-gum, but the squat, little package it came in. It was that proportionally pleasing rectangle box, and its potential to make many more proportionally pleasing rectangle boxes, that I was hoping for.
Small, compact boxes, like the candy cigarettes I purchased, are made from paperboard and constructed simply with a fold-in flap or an overlapping glued seal. These boxes can easily be duplicated with your own stash of paper scraps, paste and a scissor. Like the pocket treat post, there are all sizes of templates, hidden in plain sight and everywhere that you shop, that can be used to make functional packaging.


Next time you are at the grocery store, keep your eyes peeled for potential templates; look past the label and branding of the product and pay attention to the box size and dimensions.
Common products that come in pleasing small boxes:
a mini box of Milk Duds (regular candy boxes are good too)
a box of tinned fish
a box of bar soap
a box of playing cards
a box containing toothpaste
boxes for medicine bottles
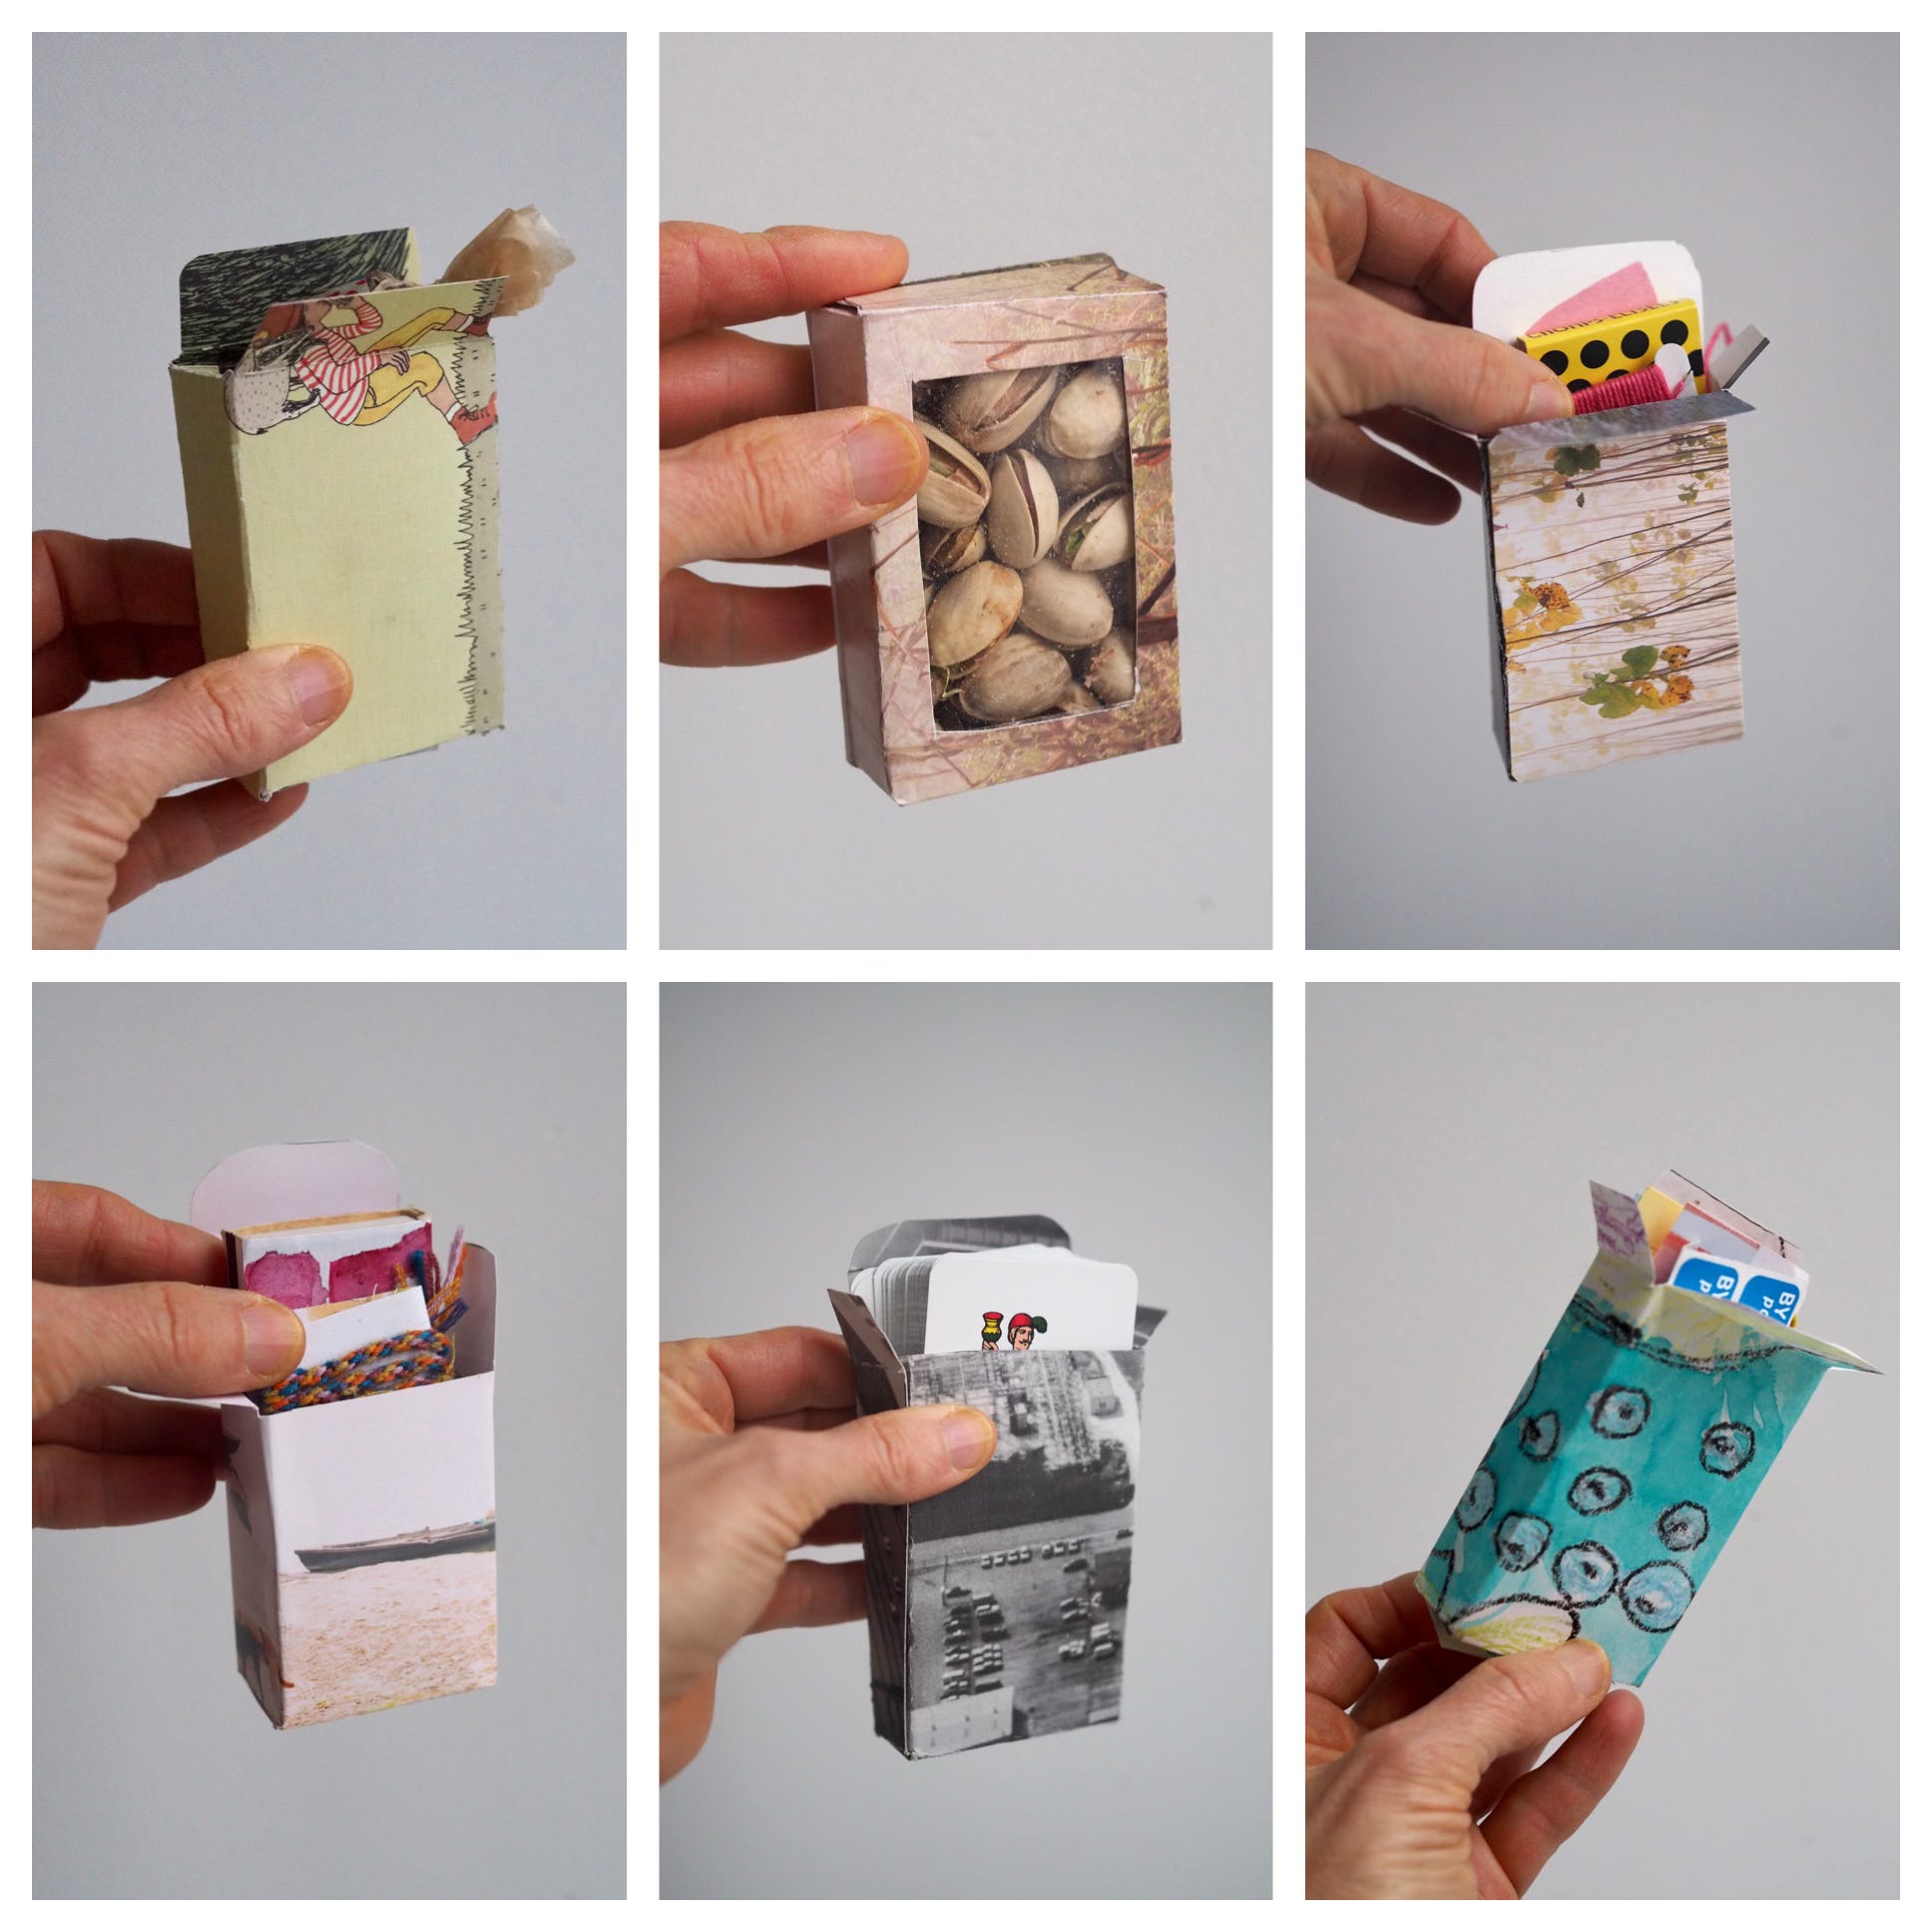
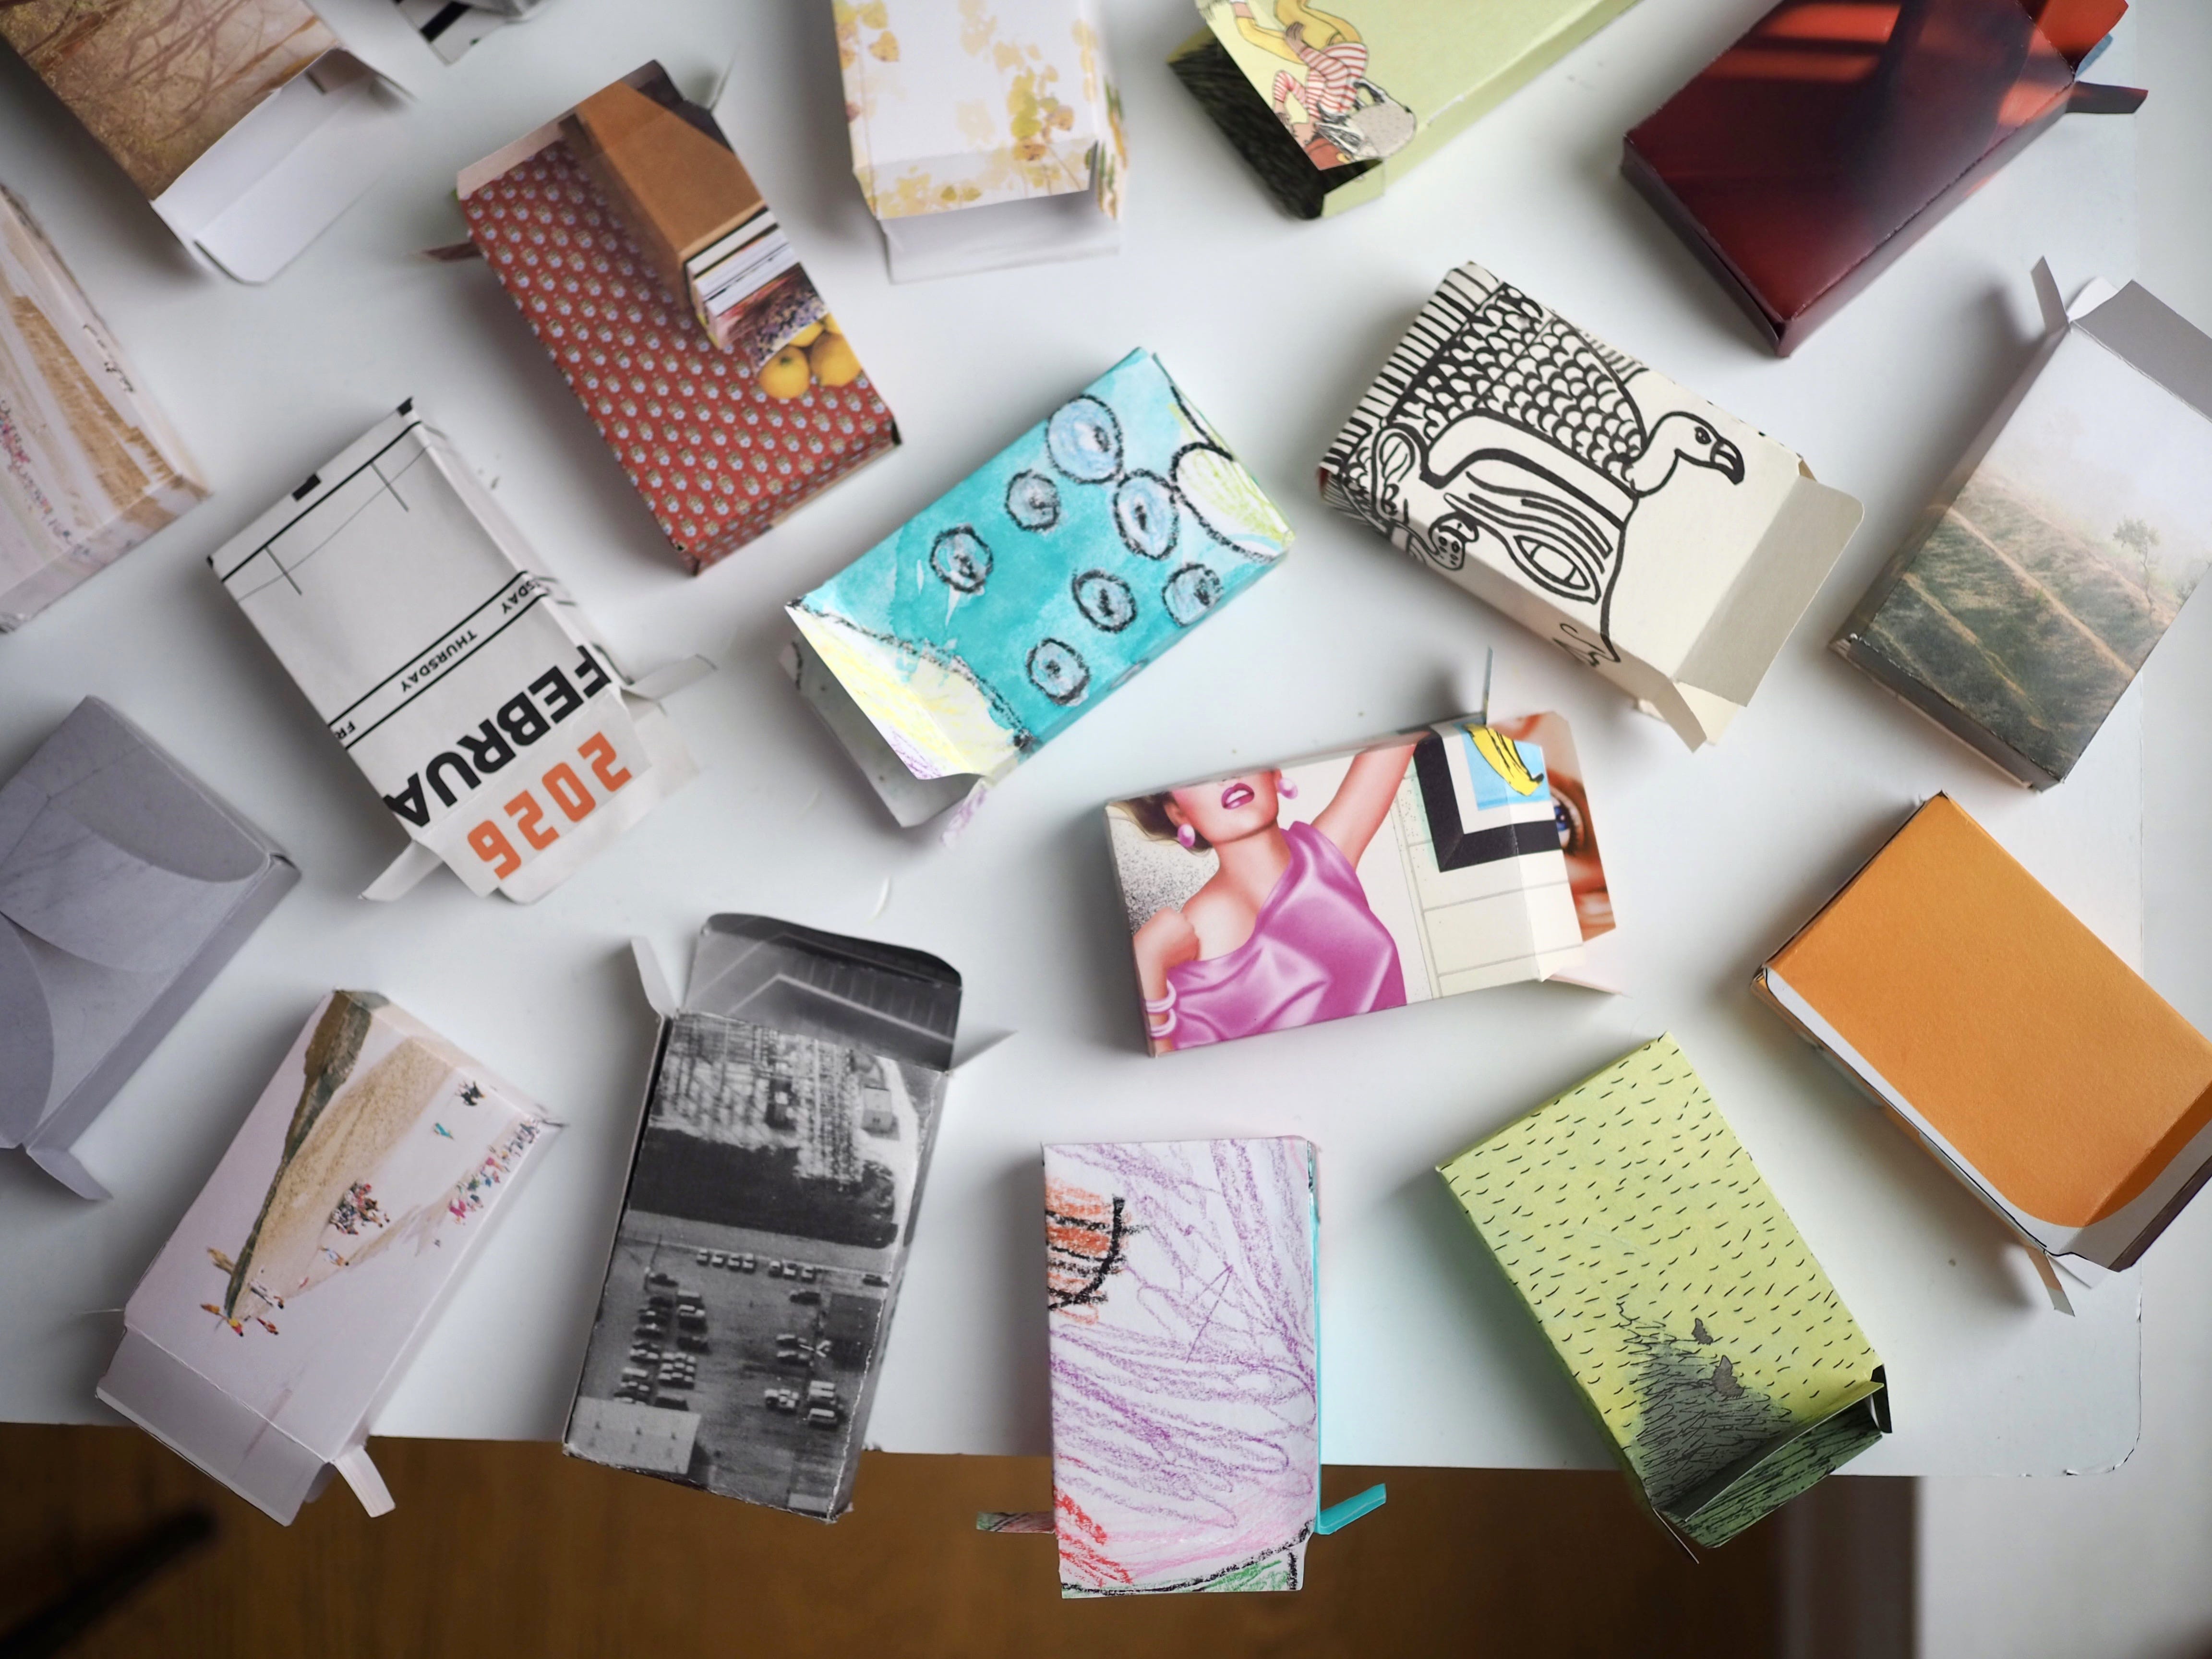
A sheet of paper takes on new life when reimagined into 3 dimensions; the way the front imagery or text wraps the sides and back, the sneak of contrast image from inside the box, the layered tabs when open. Of course, if you are reading this, you probably already scavenge the good papers, rip up the magazines and snatch the picture books from the free library. Once you start to see the potential in the illustration, the font, the photographs, or thick mat paper, you can never again unsee it.
While almost any type of paper can work to make these boxes, paperboard or cardstock works best to construct a sturdy box.
Places to source thick papers:
Calendar pages
Magazine covers (sometimes pages)
Children’s books
Kid’s multi-media art
Art books
Folders
Supplies for box making:
box packaging as template
paper (the thicker the paper, the more sturdy the box)
pen or pencil
scissor
glue
How to construct a box from existing packaging:
Carefully open the flaps of your cardboard package and unseal the glued overlap seam on the side of the box.
Place the flattened box onto your paper, and trace the perimeter with a pen or pencil.
Cut out the traced outline from the paper.
Refer to the original box packaging to see where fold creases are made and duplicate them on your cut template.
Apply a thin layer of glue (I used a glue stick) to the side box tab to connect the two sides of the box together, and press to seal.
If the box design does not have a tab closure on both ends, then seal one end closed with glue. Fill your box and seal the second side.


Tips for making your own boxes:
Place your box packaging over your paper deliberately, so you are tracing on the image or design you want to see on your finished box.
Or, get as many templates as possible from one paper by configuring them tightly.
To cut multiple box templates at once, place a traced template over a second or third sheet of paper, and carefully cut all the sheets at once.
Batch a bunch of templates and store them in a file. When you need a box, it’s much easier to fold and glue, than to store a bunch of empty boxes that can get crushed.
Save one template every time you make a box from new packaging. This way you can choose from your saved templates when you want to package a gift. You can sketch faint lines on the saved template so you know where you need to make your box folds. (I punch a hole in the corner of my templates and string them together, where they hang in a closet.)

If you're making one, you might as well make a ton. These cut templates remain flat for easy storage, and can be quickly folded and glued when you need a quick box.

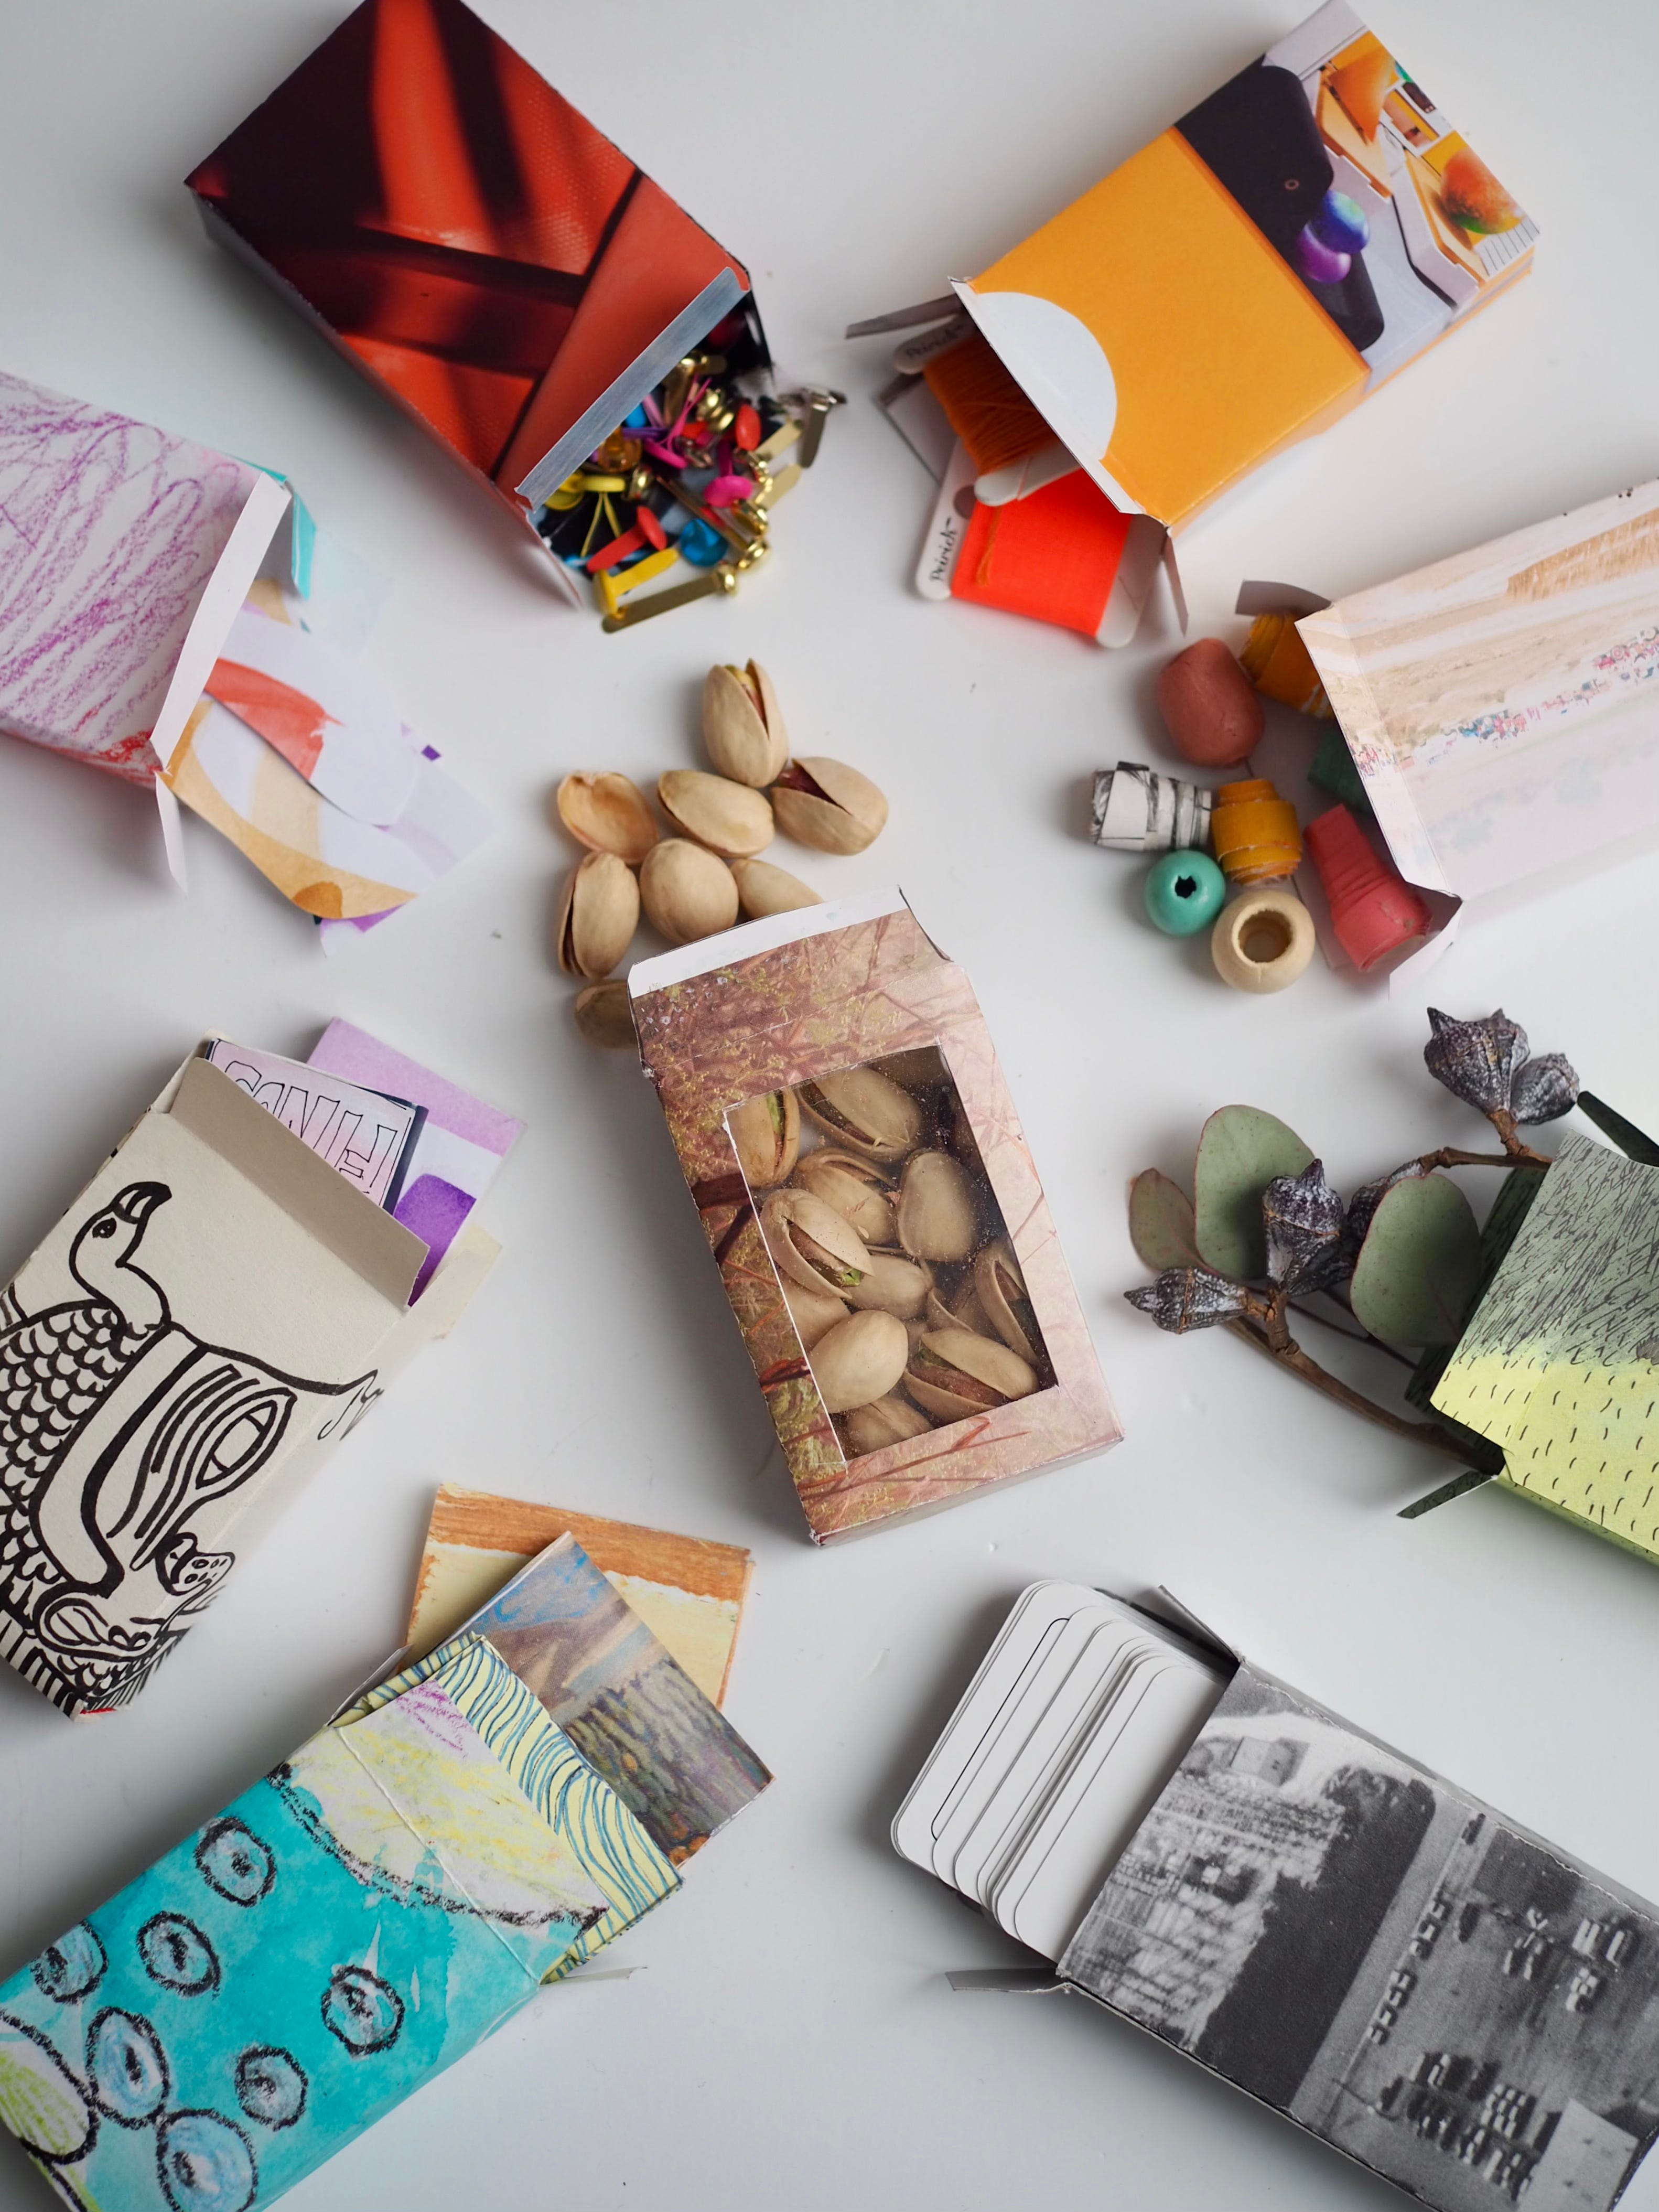
To make a box with a see-through window:
Supplies:
paper box template
clear packing tape
small craft knife
Instructions for adding a see-through window:
With the flat, cut-out template, draw or trace a rectangular-shaped window on one side of your box (see box-making instructions above). Be sure the cut window is small enough so there’s a border edge of paper space on all surrounding sides.
With a sharp blade, carefully cut out that traced window.
Place a piece of clear packing tape, sticky side up, so that it just covers the cut out window, and on the inside of the box (the side you won’t see).
Place a second piece of tape, this time slightly larger, over the first piece, sticky side down, so it covers the first piece of tape and adheres to the inside of the box.
Fold the rest of the box as you would normally.


Suggestions for what to put in the boxes:
small crafting supplies
foil covered chocolates
nature finds
found paper scraps
hard to wrap do-dads
beads
office notions
You can personalize the papers before folding the box with drawings, written messages or stickers. Stack a few boxes and tie them together with ribbon, place a bunch in a gusset bag. After all, a box this sweet is a gift in itself.
So helpful! I struggle with spatial relations so having a template will make it much easier to do this.
But more importantly— do the candy cigarettes still “puff” when you pretend smoke them!?!?
You are a true artist with such creative imagination ! Thank you!